|

- Image Credits
-
Cadaver images by BlueLink are licensed under CC BY-NC 4.0 with notification of the original authors. Labelling by Jennifer Lange.
|
- Answer Key (click to show/hide answers)
-
A - pectoralis major
B - linea alba
C - external oblique
D - rectus abdominus
E - tendinous intersections
|
|

- Image Credits
-
Cadaver images by BlueLink are licensed under CC BY-NC 4.0 with notification of the original authors. Labelling by Jennifer Lange.
|
- Answer Key (click to show/hide answers)
-
A - sartorius
B - adductor longus
C - rectus femoris
D - vastus medialis
E - tensor fasciae latae
F - gluteus maximus
G - iliotibial tract/band
H - vastus lateralis
I - patella
|
|

- Image Credits
-
Cadaver images by BlueLink are licensed under CC BY-NC 4.0 with notification of the original authors. Labelling by Jennifer Lange.
|
- Answer Key (click to show/hide answers)
-
A - psoas major
B - pectineus
C - adductor longus
D - grascilis
E - vastus intermedius
F - vastus medialis
G - sartorius (cut)
H - tensor fasciae latae
I - iliotibial tract/band
J - vastus lateralis
K - rectus femoris (cut)
|
|

- Image Credits
-
Cadaver images by BlueLink are licensed under CC BY-NC 4.0 with notification of the original authors. Labelling by Jennifer Lange.
|
- Answer Key (click to show/hide answers)
-
A - gluteus maximus
B - iliotibial tract/band
C - biceps femoris
D - popliteus
E - grascilis
F - semimembranosus
G - semitendinosus
|
|

- Image Credits
-
Cadaver images by BlueLink are licensed under CC BY-NC 4.0 with notification of the original authors. Labelling by Jennifer Lange.
|
- Answer Key (click to show/hide answers)
-
A - biceps femoris
B - gastrocnemius
C - soleus
D - grascilis
E - semimembranosus
F - semitendinosus
G - calcaneal (Achilles) tendon
|
|

- Image Credits
-
Cadaver images by BlueLink are licensed under CC BY-NC 4.0 with notification of the original authors. Labelling by Jennifer Lange.
|
- Answer Key (click to show/hide answers)
-
A - fibularis longus
B - tibialis anterior
C - extensor digitorum longus
D - gastrocnemius
E - soleus
F - fibularis brevis
G - calcaneal (Achilles) tendon
|
|

- Image Credits
-
Cadaver images by BlueLink are licensed under CC BY-NC 4.0 with notification of the original authors. Labelling by Jennifer Lange.
|
- Answer Key (click to show/hide answers)
-
A - deltoid
B - biceps brachii
C - brachialis
D - external oblique
|
|

- Image Credits
-
Cadaver images by BlueLink are licensed under CC BY-NC 4.0 with notification of the original authors. Labelling by Jennifer Lange.
|
- Answer Key (click to show/hide answers)
-
A - deltoid
B - triceps brachii
C - infraspinatus
D - teres minor
E - teres major
|

- Image Credits
-
Cadaver images by BlueLink are licensed under CC BY-NC 4.0 with notification of the original authors. Labelling by Jennifer Lange.
|
- Answer Key (click to show/hide answers)
-
A - pronator teres
B - palmaris longus
C - flexor carpi radialis
D - flexor carpi ulnaris
E - flexor digitorum superficialis
F - brachioradialis
|
|

- Image Credits
-
Cadaver images by BlueLink are licensed under CC BY-NC 4.0 with notification of the original authors. Labelling by Jennifer Lange.
|
- Answer Key (click to show/hide answers)
-
A - brachioradialis
B - extensor carpi radialis longus
C - extensor carpi radialis brevis
D - extensor digitorum
E - extensor carpi ulnaris
F - triceps brachii
G - flexor carpi ulnaris
H - palmaris longus
|
|

- Image Credits
-
Cadaver images by BlueLink are licensed under CC BY-NC 4.0 with notification of the original authors. Labelling by Jennifer Lange.
|
- Answer Key (click to show/hide answers)
-
A - levator scapluae
B - supraspinatus
C - infraspinatus
D - teres minor
E - teres major
F - triceps brachii
G - rhomboid major
H - erector spinae (group)
I - latissimus dorsi
|
|

- Image Credits
-
Cadaver images by BlueLink are licensed under CC BY-NC 4.0 with notification of the original authors. Labelling by Jennifer Lange.
|
- Answer Key (click to show/hide answers)
-
A - deltoid
B - pectoralis major
C - serratus anterior
D - latissimus dorsi
E - sternocleidomastoid
|
|

- Image Credits
-
Cadaver images by BlueLink are licensed under CC BY-NC 4.0 with notification of the original authors. Labelling by Jennifer Lange.
|
- Answer Key (click to show/hide answers)
-
A - pectoralis major
B - pectoralis minor
C - serratus anterior
D - external oblique
E - deltoid
|
|

- Image Credits
-
Cadaver images by BlueLink are licensed under CC BY-NC 4.0 with notification of the original authors. Labelling by Jennifer Lange.
|
- Answer Key (click to show/hide answers)
-
A - trapezius
B - deltoid
C - teres major
D - latissimus dorsi
E - gluteus maximus
|
|
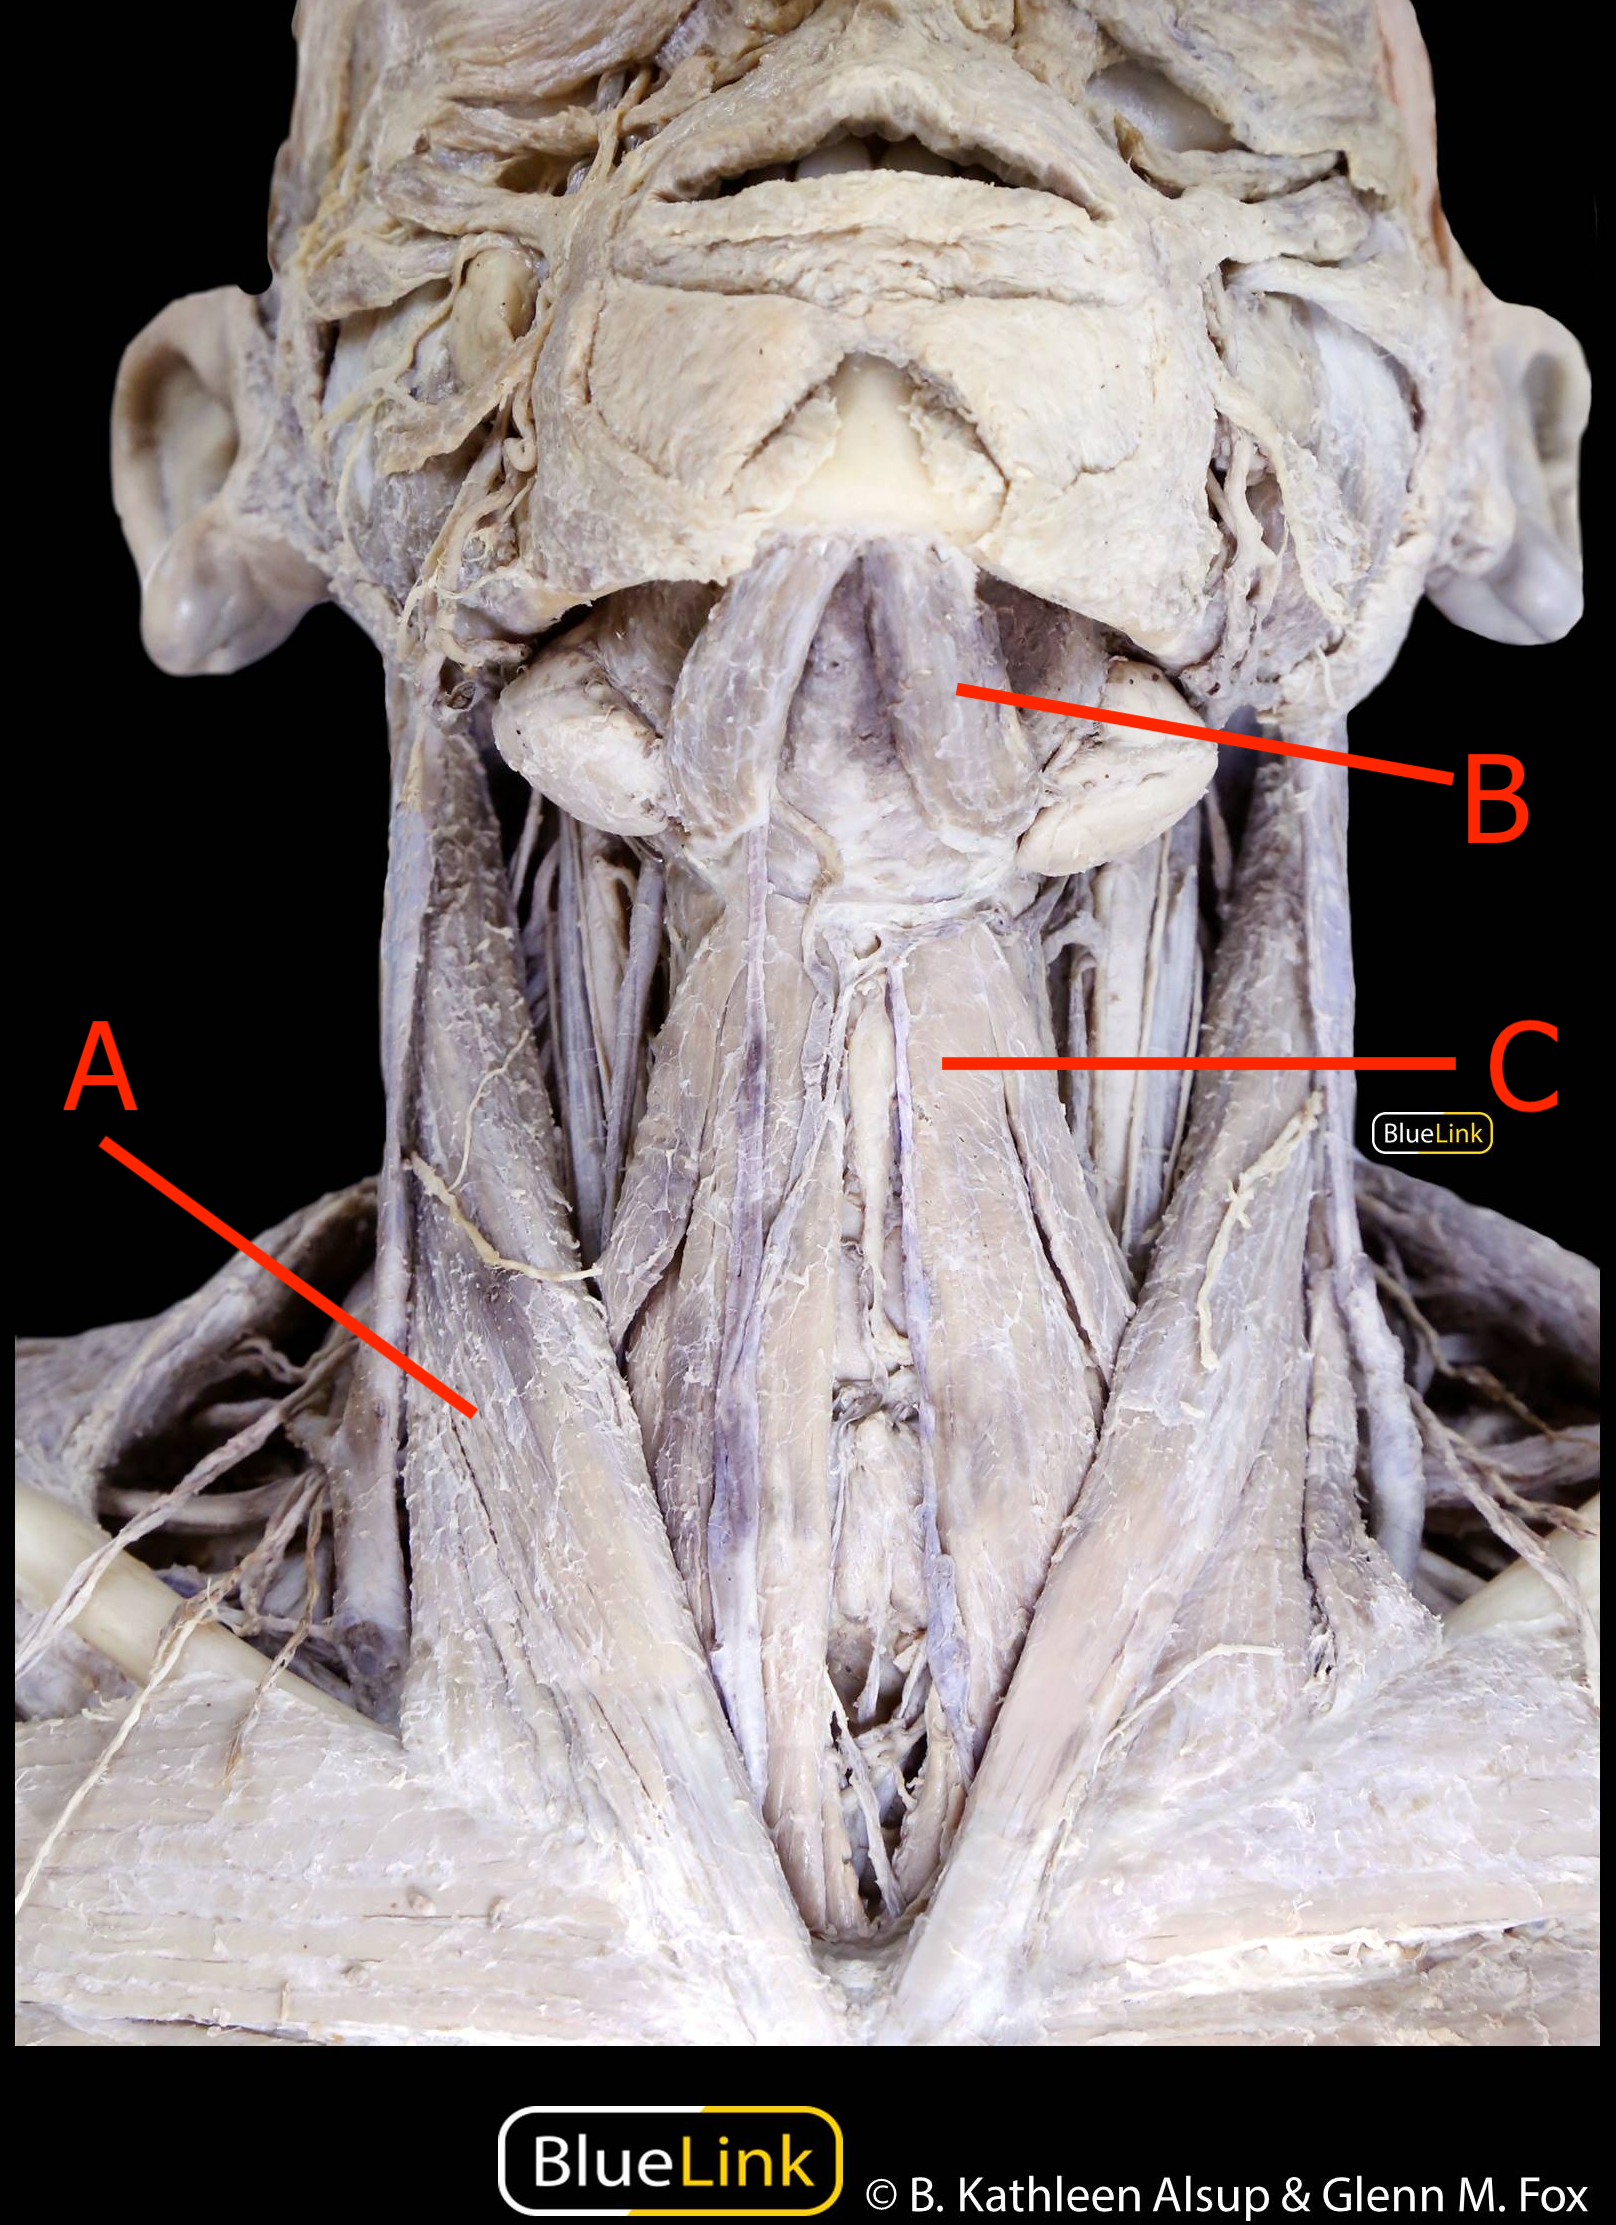
- Image Credits
-
Cadaver images by BlueLink are licensed under CC BY-NC 4.0 with notification of the original authors. Labelling by Jennifer Lange.
|
- Answer Key (click to show/hide answers)
-
A - sternocleidomastoid
B - digastric
C - sternohyoid
|
|

- Image Credits
-
Model images by EUSKALANATO are licensed under CC BY-NC-SA 2.0. Labelling by Sofia Elizondo.
|
- Answer Key (click to show/hide answers)
- Anterior View

|
|

- Image Credits
-
Model images by EUSKALANATO are licensed under CC BY-NC-SA 2.0. Labelling by Sofia Elizondo.
|
- Answer Key (click to show/hide answers)
- Lateral View
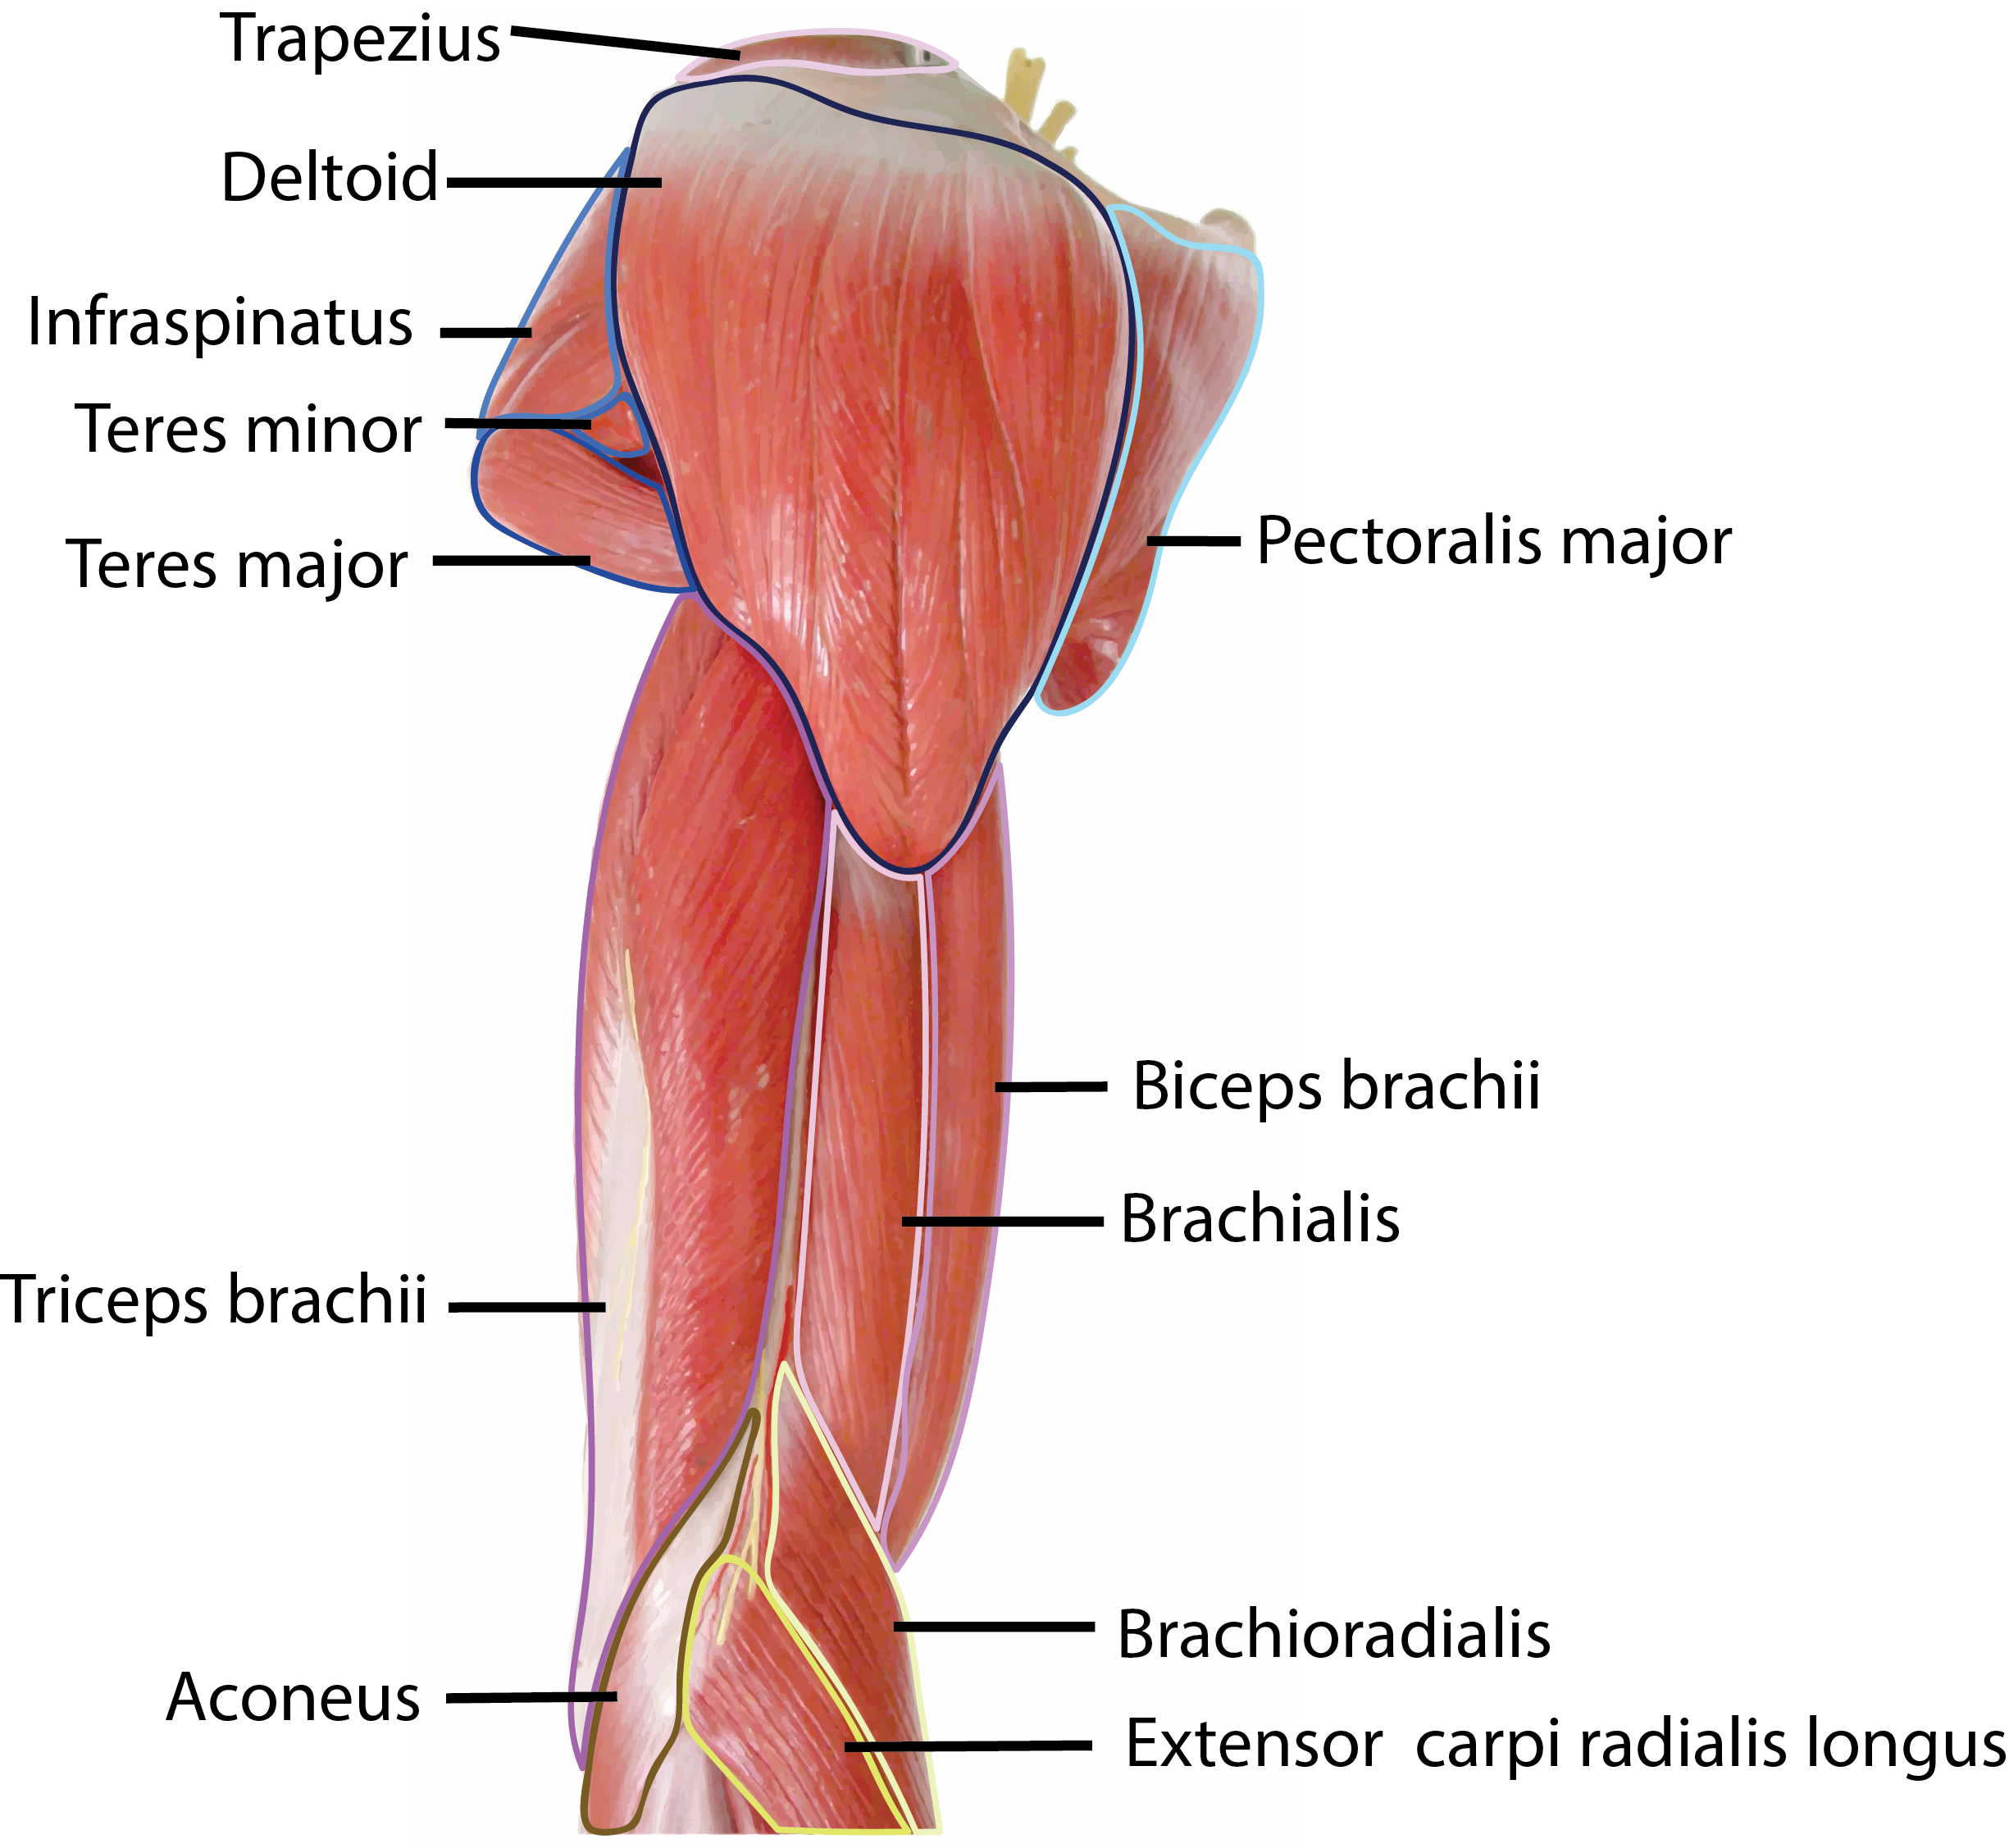
|
|

- Image Credits
-
Model images by EUSKALANATO are licensed under CC BY-NC-SA 2.0. Labelling by Sofia Elizondo.
|
- Answer Key (click to show/hide answers)
- Medial View

|
|

- Image Credits
-
Model images by EUSKALANATO are licensed under CC BY-NC-SA 2.0. Labelling by Sofia Elizondo.
|
- Answer Key (click to show/hide answers)
- Posterior View

|
|

- Image Credits
-
Model images by EUSKALANATO are licensed under CC BY-NC-SA 2.0. Labelling by Sofia Elizondo.
|
- Answer Key (click to show/hide answers)
- Anterior View

|
|

- Image Credits
-
Model images by EUSKALANATO are licensed under CC BY-NC-SA 2.0. Labelling by Sofia Elizondo.
|
- Answer Key (click to show/hide answers)
-
Medial View
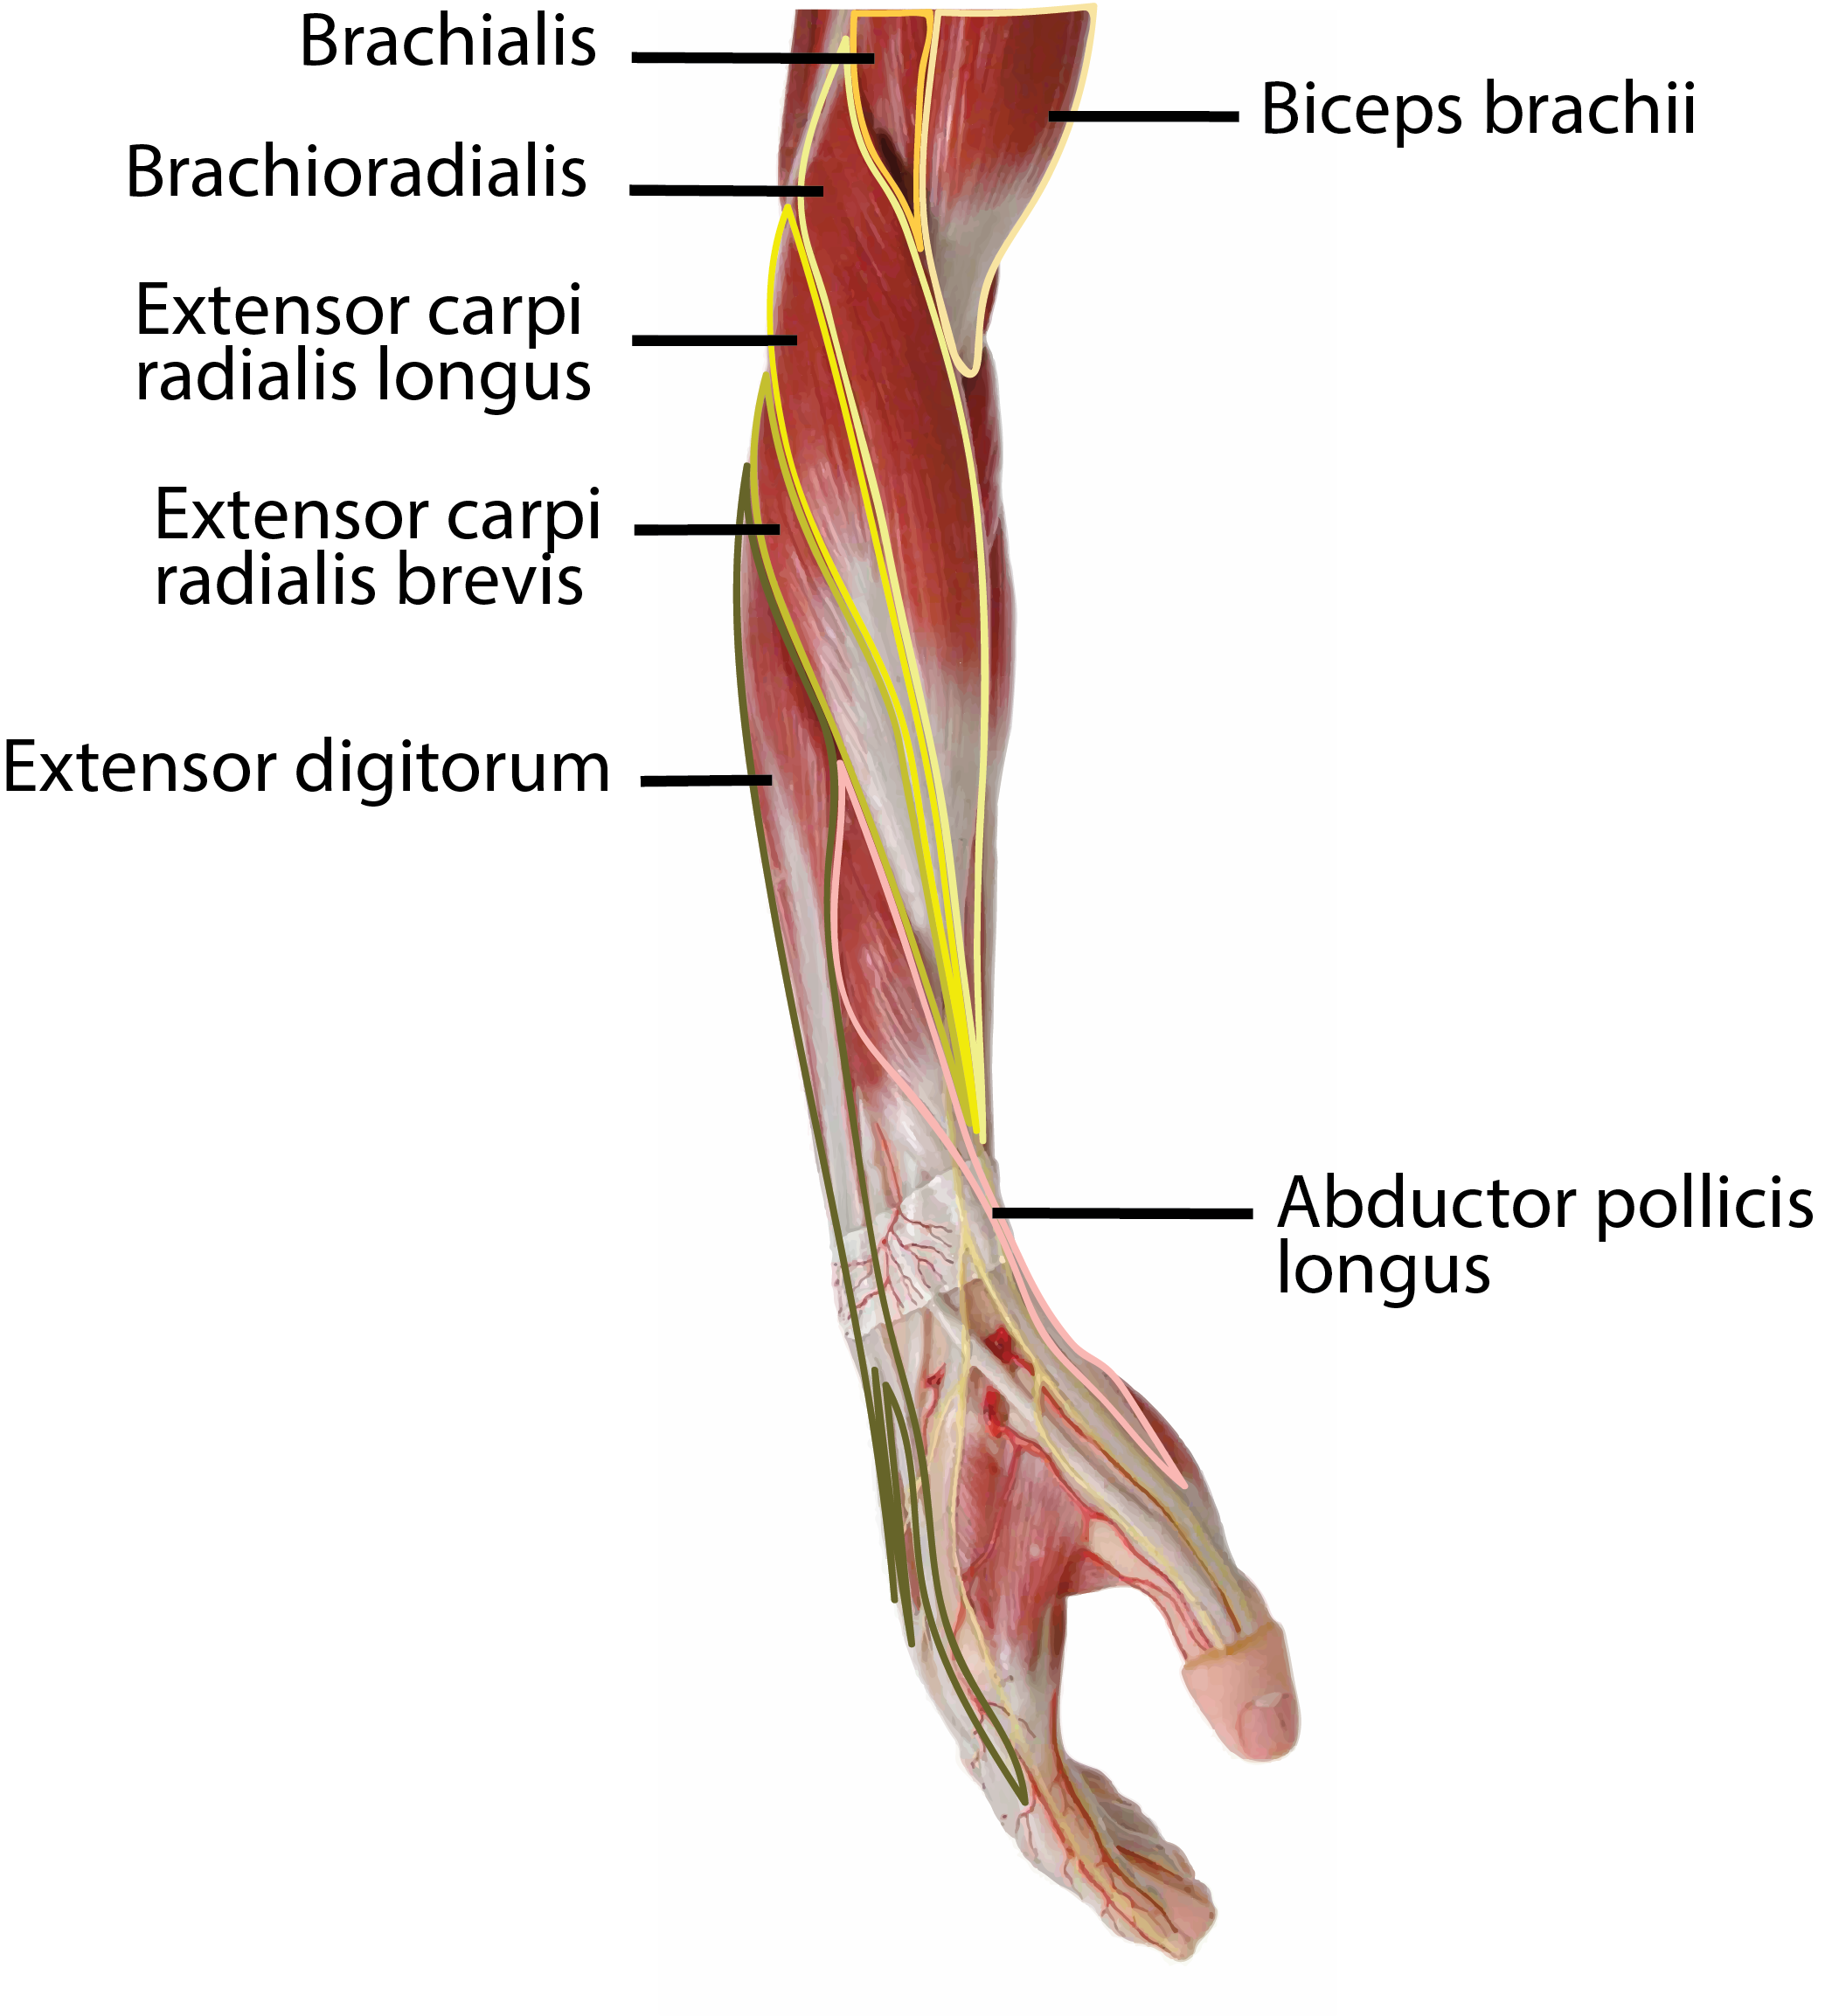
|
 - Image Credits
-
Model images by EUSKALANATO are licensed under CC BY-NC-SA 2.0. Labelling by Sofia Elizondo.
|
- Answer Key (click to show/hide answers)
-
Posterior View

|
|

- Image Credits
-
Torso model images by Jennifer Lange are licensed under CC BY-NC-SA 4.0. Labelling by Sofia Elizondo.
|
- Answer Key (click to show/hide answers)
-

|
|

- Image Credits
-
Torso model images by Jennifer Lange are licensed under CC BY-NC-SA 4.0. Labelling by Sofia Elizondo.
|
- Answer Key (click to show/hide answers)
-
|
|

- Image Credits
-
Torso model images by Jennifer Lange are licensed under CC BY-NC-SA 4.0. Labelling by Sofia Elizondo.
|
- Answer Key (click to show/hide answers)
-
|
|

- Image Credits
-
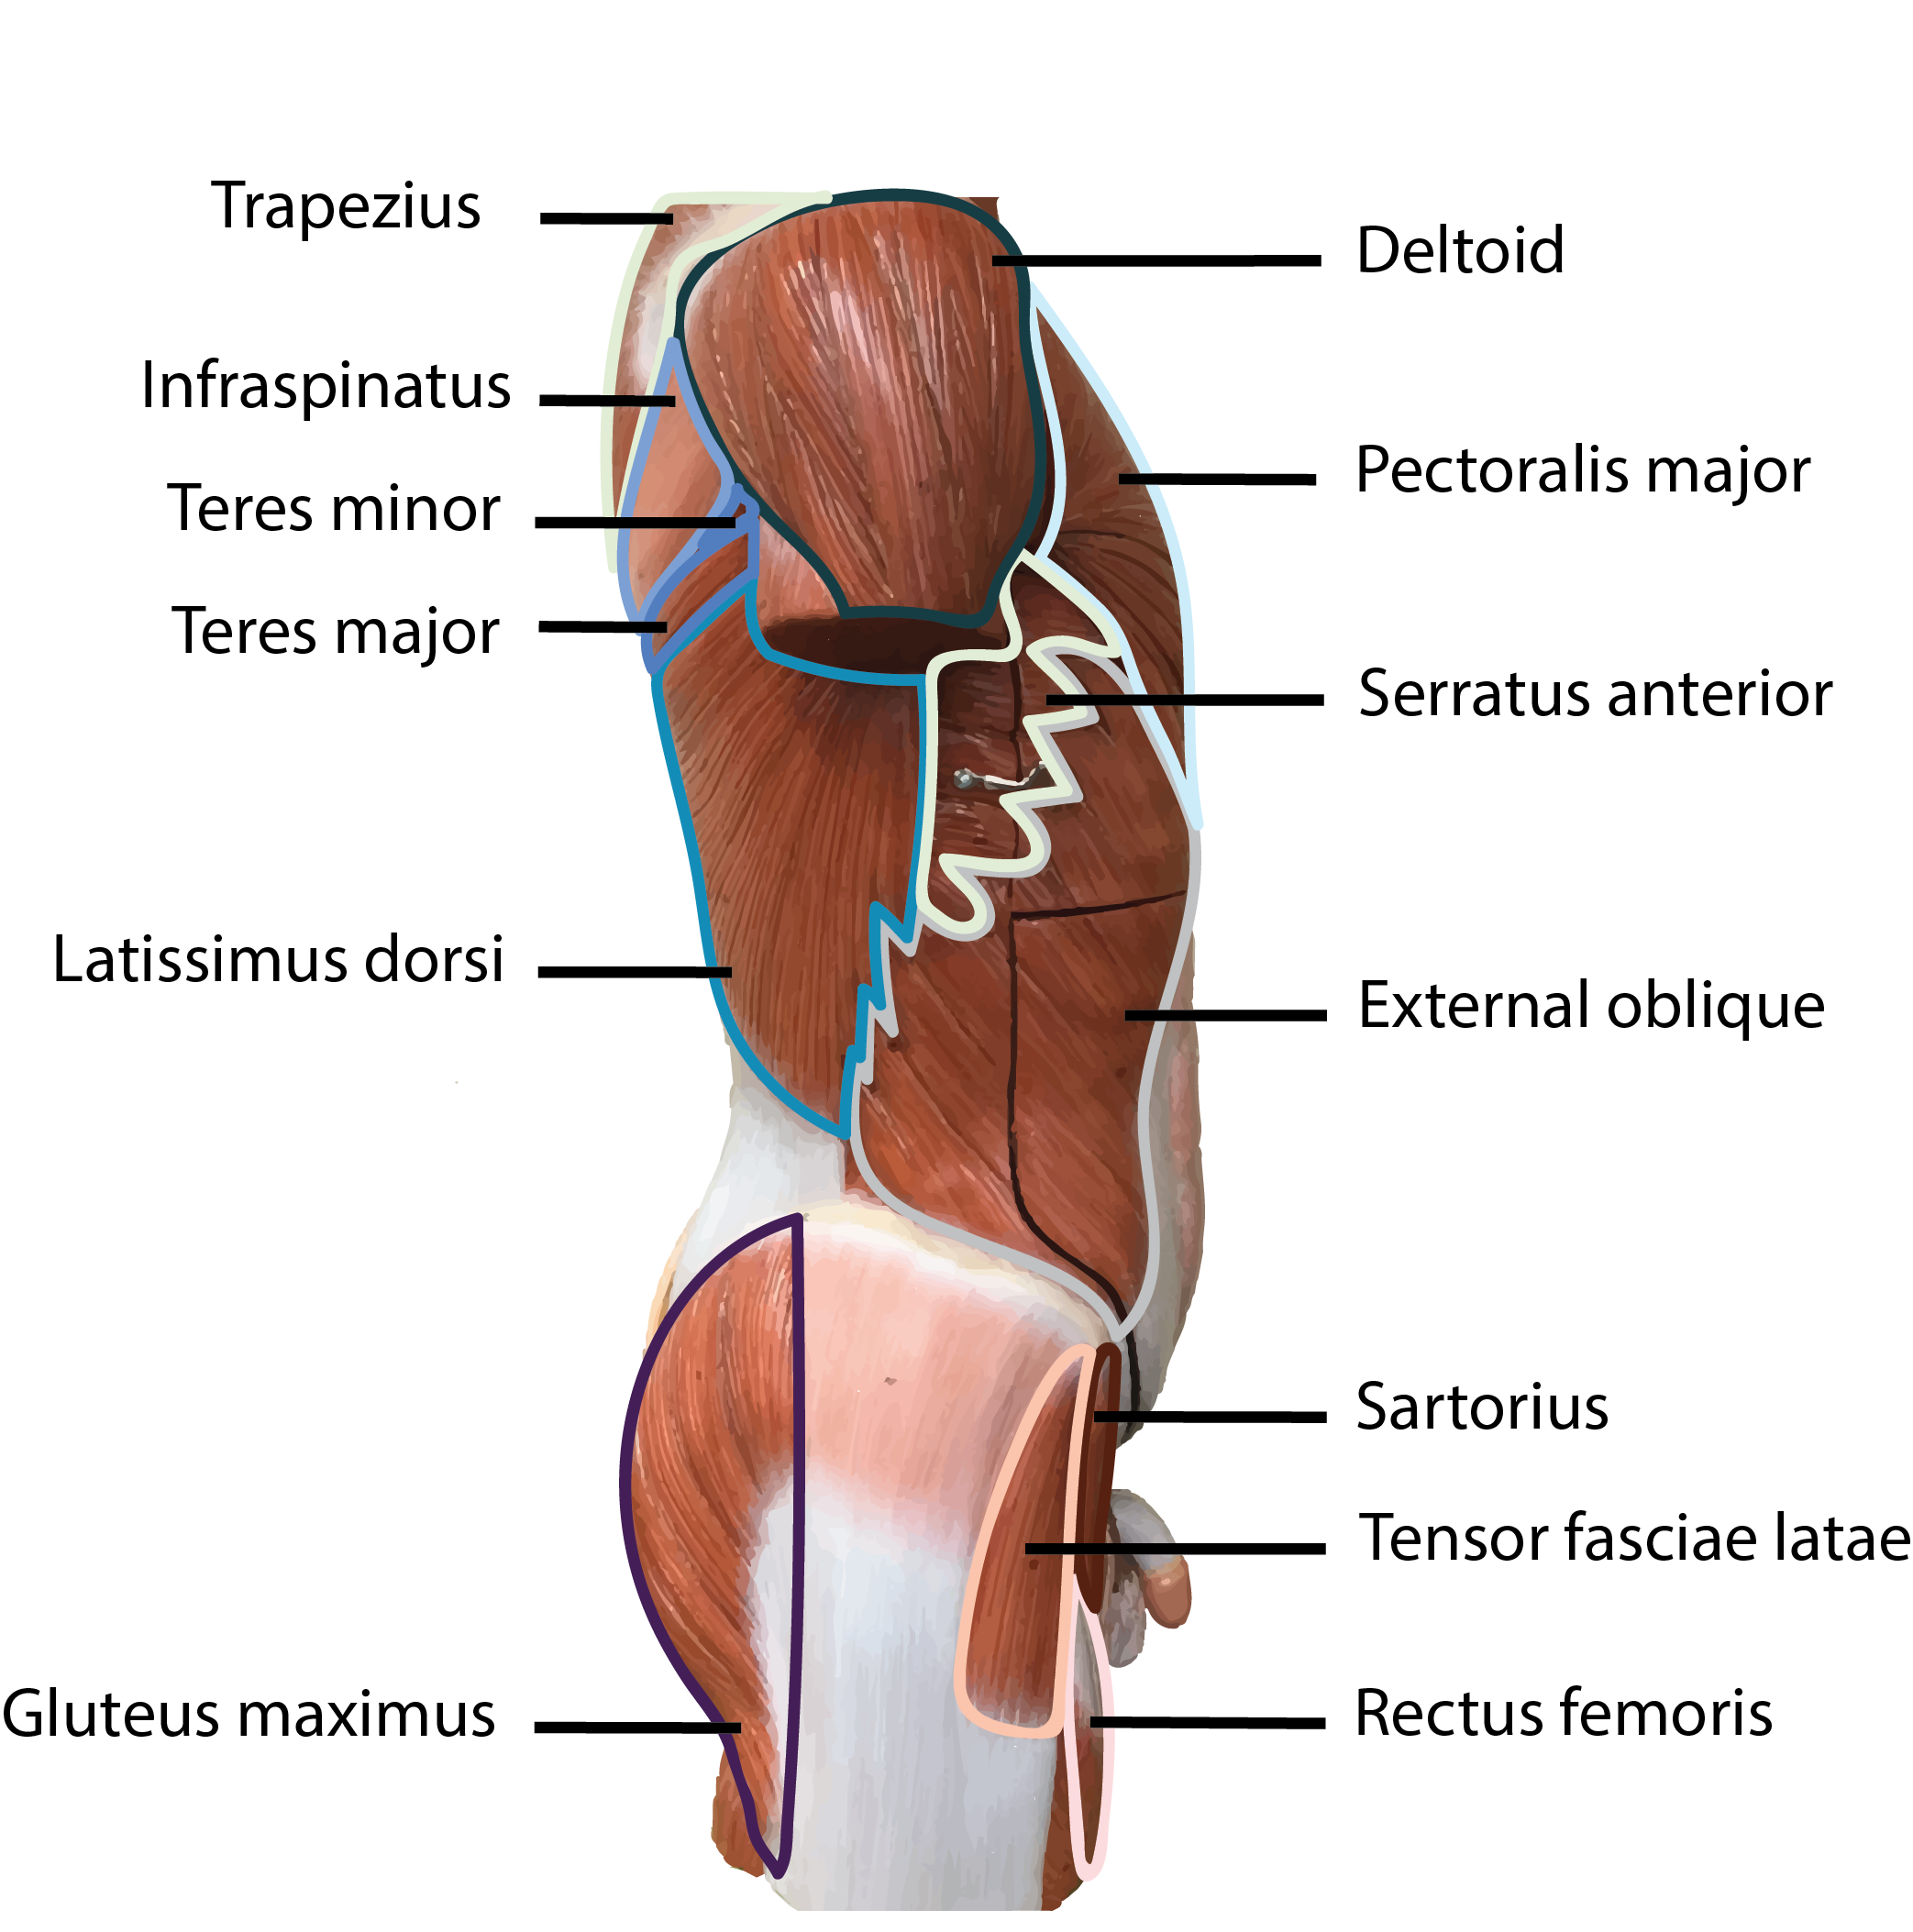
Torso model images by Jennifer Lange are licensed under CC BY-NC-SA 4.0. Labelling by Sofia Elizondo.
|
- Answer Key (click to show/hide answers)
-

|
|

- Image Credits
-
Torso model images by Jennifer Lange are licensed under CC BY-NC-SA 4.0. Labelling by Sofia Elizondo.
|
- Answer Key (click to show/hide answers)
-

|
|

- Image Credits
-
Model images byEUSKALANATO arelicensed underCC BY-NC-SA 2.0. Labelling by Jennifer Lange.
|
- Answer Key (click to show/hide answers)
-

|
|
- Image Credits
-
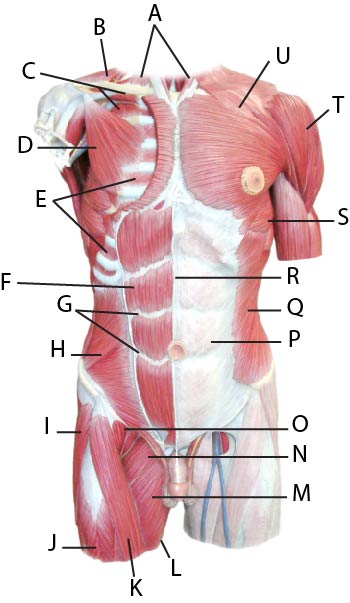
Model images by EUSKALANATO are licensed under CC BY-NC-SA 2.0. Labelling by Jennifer Lange.
|
- Answer Key (click to show/hide answers)
-

|
|

- Image Credits
-
Model images by EUSKALANATO are licensed under CC BY-NC-SA 2.0. Labelling by Sofia Elizondo.
|
- Answer Key (click to show/hide answers)
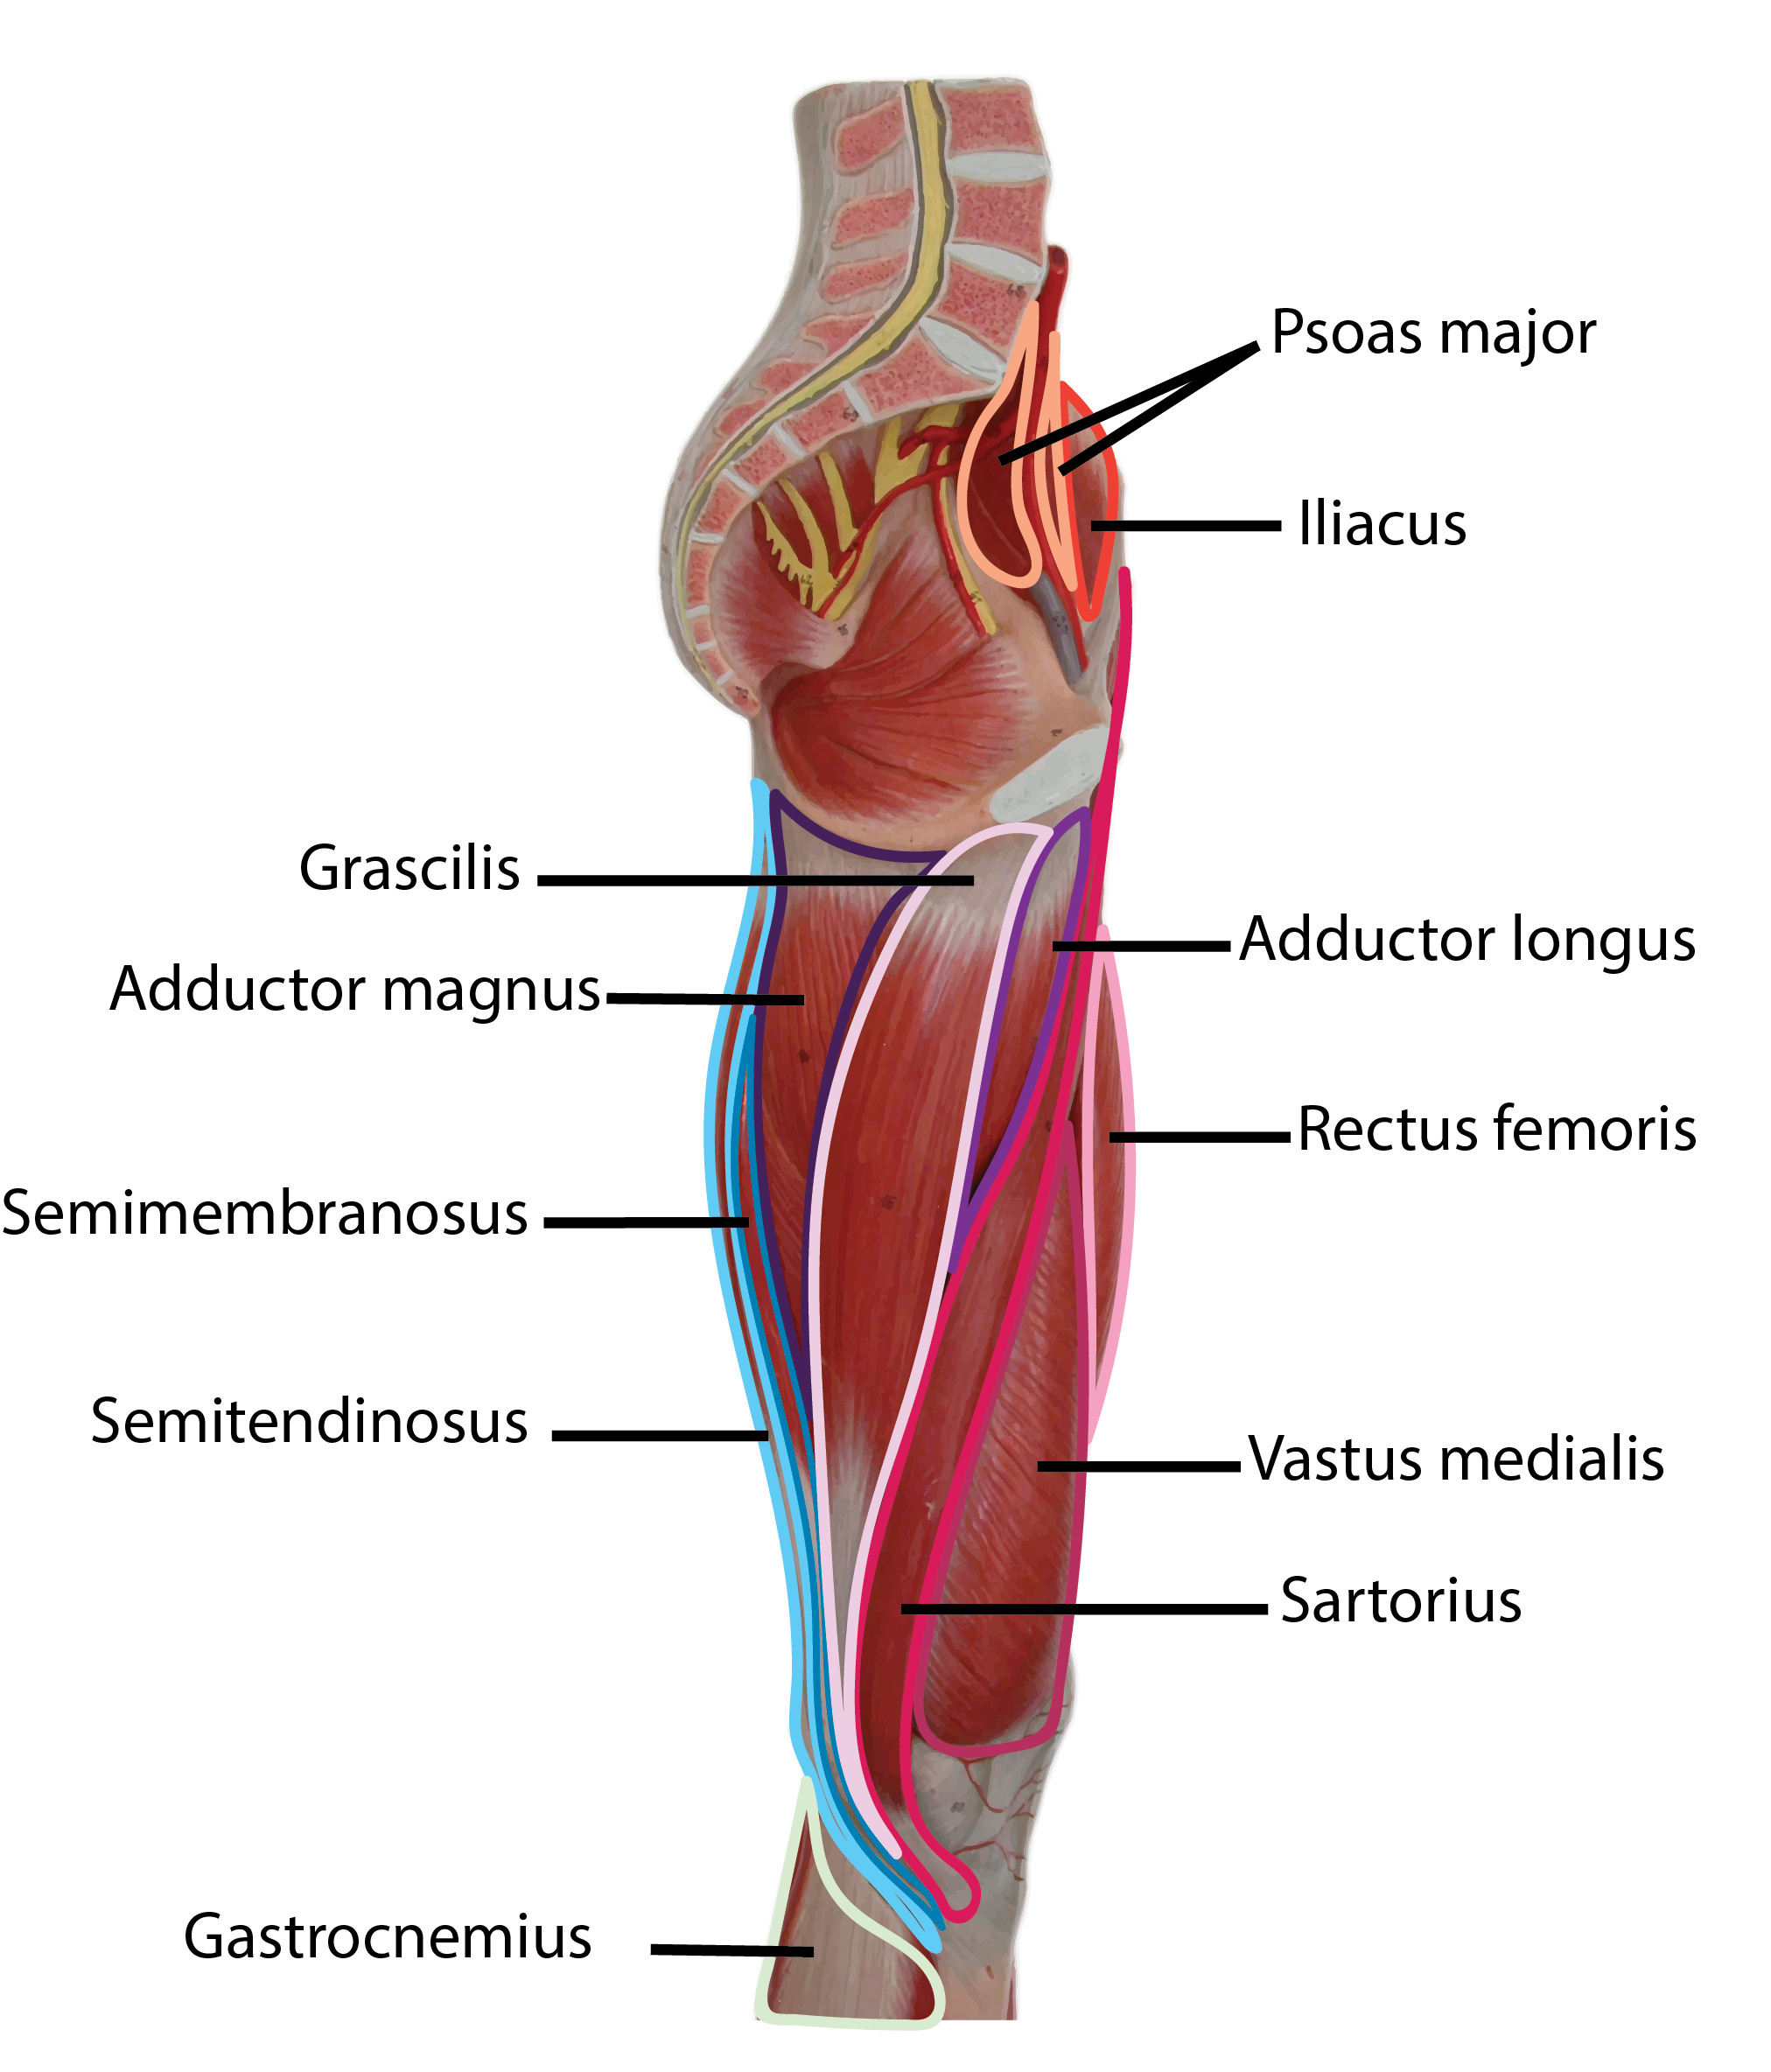
- Medial View
|
|

- Image Credits
-
Model images by EUSKALANATO are licensed under CC BY-NC-SA 2.0. Labelling by Sofia Elizondo.
|
- Answer Key (click to show/hide answers)
- Posterior View

|
|

- Image Credits
-
Model images by EUSKALANATO are licensed under CC BY-NC-SA 2.0. Labelling by Sofia Elizondo.
|
- Answer Key (click to show/hide answers)
- Anterior View

|
|

- Image Credits
-
Model images by EUSKALANATO are licensed under CC BY-NC-SA 2.0. Labelling by Sofia Elizondo.
|
- Answer Key (click to show/hide answers)
- Anterior View

|
|

- Image Credits
-
Model images by EUSKALANATO are licensed under CC BY-NC-SA 2.0. Labelling by Sofia Elizondo.
|
- Answer Key (click to show/hide answers)
- Medial View

|
|

- Image Credits
-
Model images by EUSKALANATO are licensed under CC BY-NC-SA 2.0. Labelling by Sofia Elizondo.
|
- Answer Key (click to show/hide answers)
- Lateral View

|
|

- Image Credits
-
Eye model images by Jennifer Lange are licensed under CC BY-NC-SA 4.0.
|
- Answer Key (click to show/hide answers)
- Lateral View
A - superior rectus
B - lateral rectus
C - inferior oblique
D - inferior rectus
|
|

- Image Credits
-
Eye model images by Jennifer Lange are licensed under CC BY-NC-SA 4.0.
|
- Answer Key (click to show/hide answers)
- Superolateral View
A - superior oblique
B - medial rectus
C - superior rectus
D - lateral rectus
E - inferior oblique
|